How the scenario works
The blueprint gives you a finished Make.com scenario: you only connect your own accounts and paste your own token. LINE talks to Make.com, Make.com asks your Dialogflow agent which intent matched, and one of three modules sends the reply.
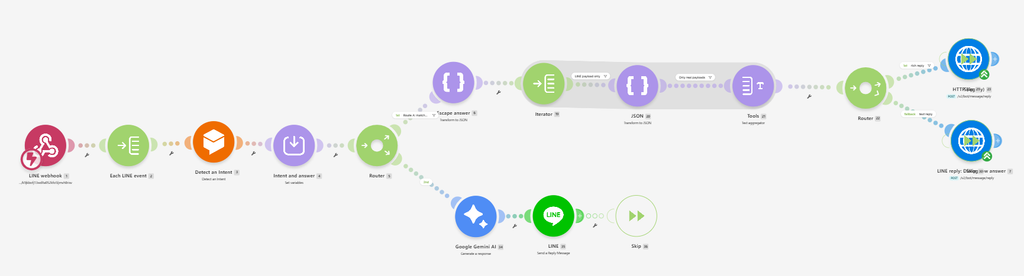
Matched intents go down Route A, which sends either the intent’s text or its LINE custom payloads. Messages with no matching intent go down Route B, where Gemini writes the answer.
Before you import
This blueprint replaces Dialogflow’s built-in LINE integration, which fails with IamPermissionDeniedException on Google’s side.
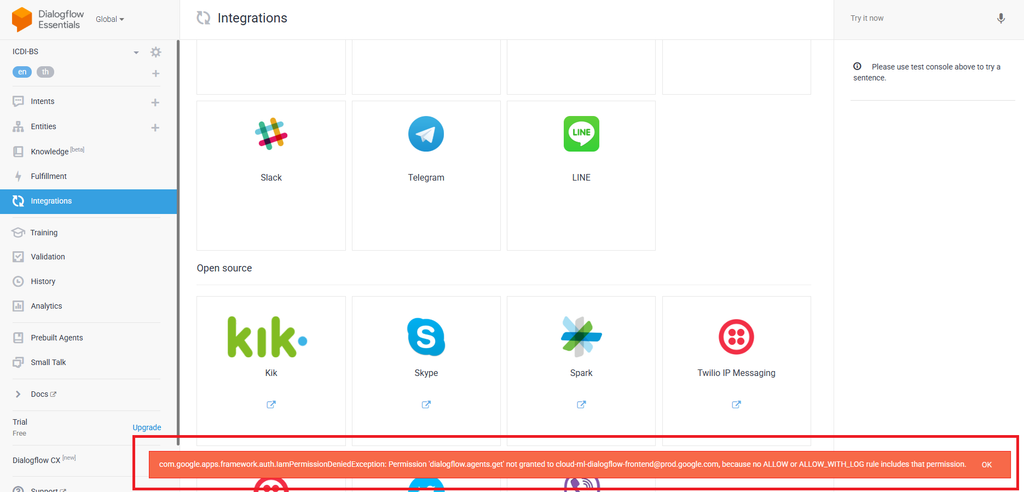
LINE sends messages to Make.com, Make.com asks Dialogflow for the intent, and Make.com sends the reply. Your intents still come from your own Dialogflow agent.
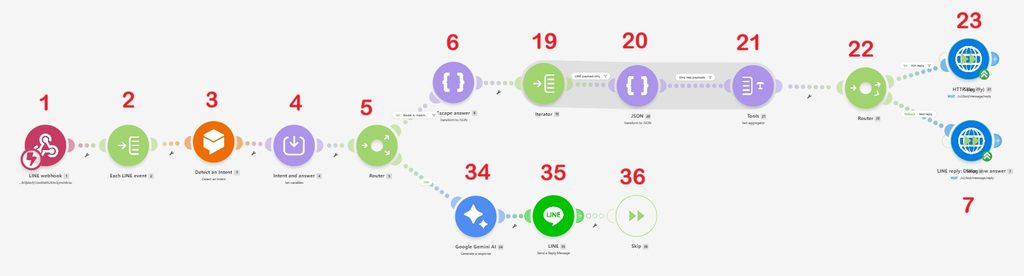
Collect these values first and keep them in a private note. Never paste them into the group chat or onto slides.
| What | Where to find it | Used in module |
|---|---|---|
| Channel access token (long-lived) | LINE Developers → your channel → Messaging API tab → Issue | 7, 23, and the LINE connection in 35 |
| Your user ID | LINE Developers → your channel → Basic settings tab | LINE connection in 35 |
| Google Cloud project ID of your agent | Dialogflow console → gear icon → General → Google Project | 3 |
| OAuth Client ID and Client secret | Created in Step 3 | Google connection in 3 |
| Gemini API key | Google AI Studio → Get API key | Gemini connection in 34 |
| Make.com account (free plan works) | make.com | Everything |
Your agent should already have at least 5 intents that answer correctly in Dialogflow’s Try it now panel. If the red IamPermissionDeniedException banner appears in the Dialogflow console, click OK and keep editing. Do not use Integrations → LINE.
Step 1: Import the blueprint
- Download
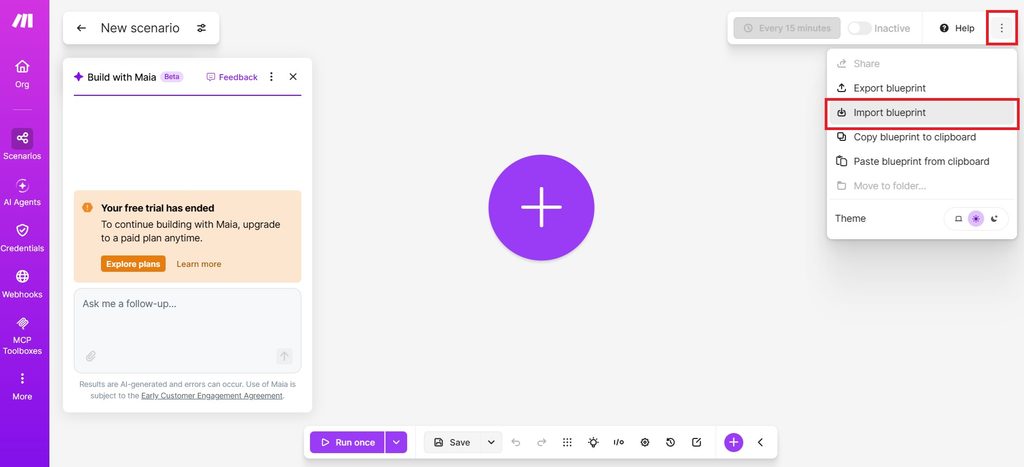
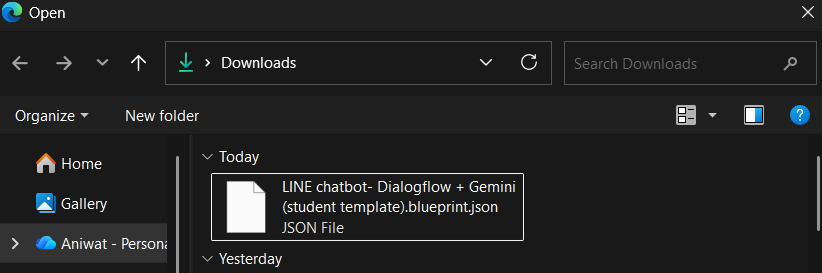
LINE_chatbot_student_template_v2.blueprint.json. - In Make.com, open Scenarios → Create a new scenario.
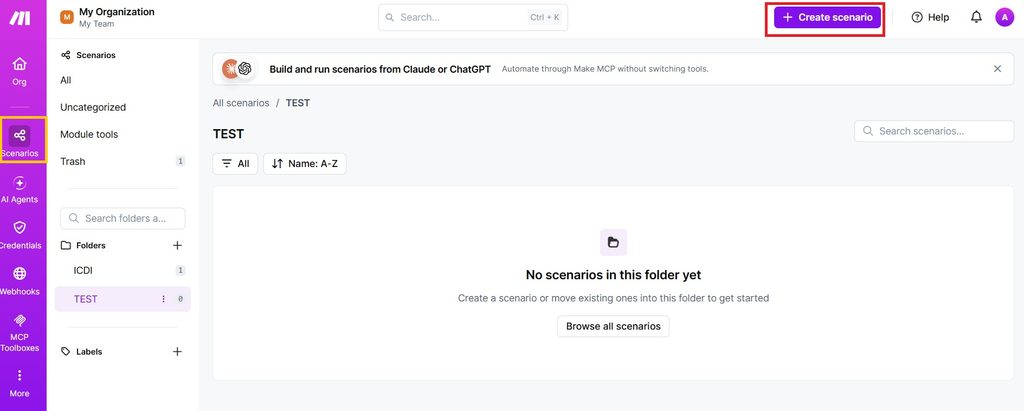
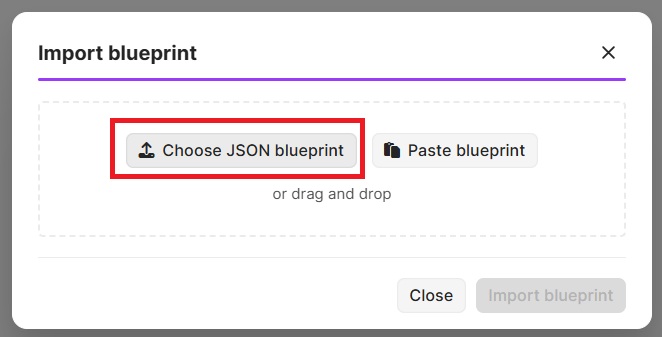
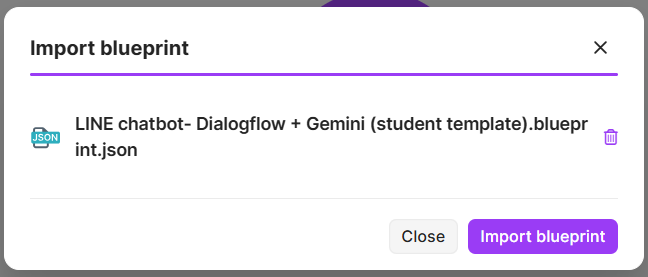
- Click the ⋯ menu at the bottom of the editor → Import blueprint → choose the file → Import blueprint.
- Rename the scenario at the top left, for example
LINE bot.
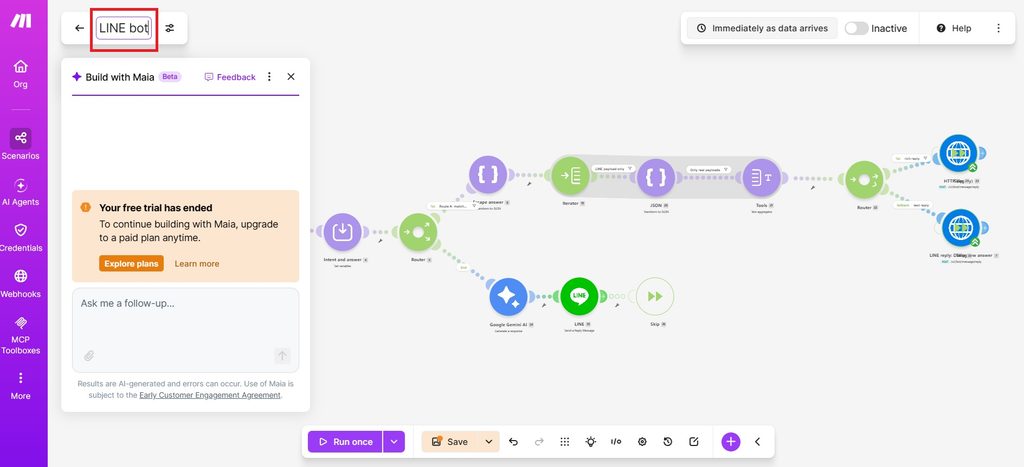
After import, several modules show a red warning. That is expected: the file carries no webhook, no connections and no tokens, so you add your own in the next steps. Module numbers in this guide match the small grey number under each module.
| Module | Name in the editor | What you must do |
|---|---|---|
| 1 | LINE webhook | Create a new webhook (Step 2) |
| 3 | Detect an Intent | Create a Google connection, pick your project (Step 3) |
| 7 | LINE reply: Dialogflow answer | Paste your channel access token (Step 4) |
| 23 | LINE reply: rich payload | Paste your channel access token (Step 4) |
| 34 | Gemini answer | Create a Gemini connection, edit the prompt (Step 5) |
| 35 | LINE reply: Gemini answer | Create a LINE connection (Step 5) |
| 2, 4, 5, 6, 19 to 22 | Iterator, variables, routers, JSON helpers | Nothing; leave as they are |
Step 2: Webhook (module 1) and LINE Developers
Module 1 is where LINE delivers every message. Each group needs its own webhook address.
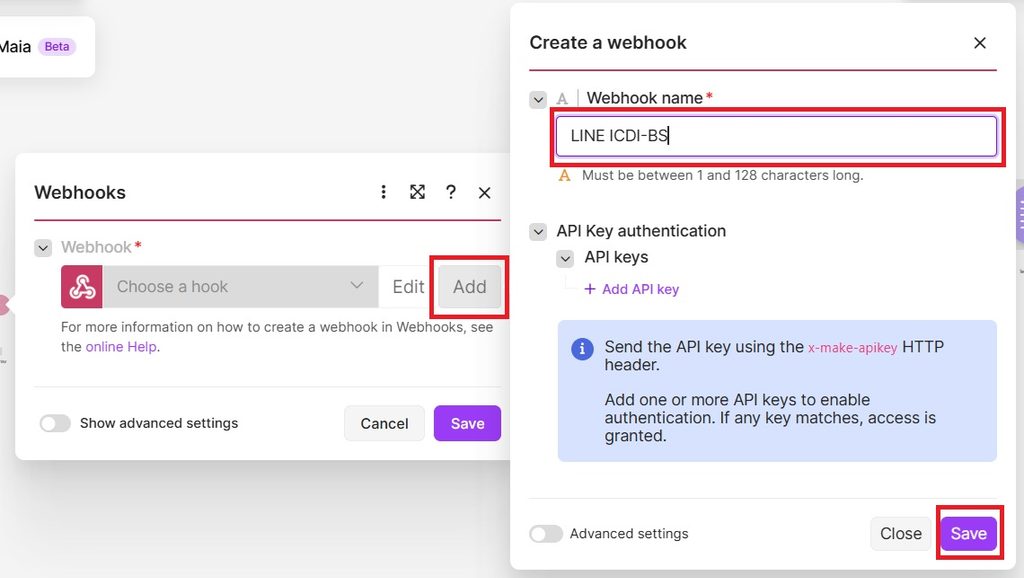
- Click module 1 LINE webhook → next to Webhook click Add → name it
LINE <group name>→ Save.
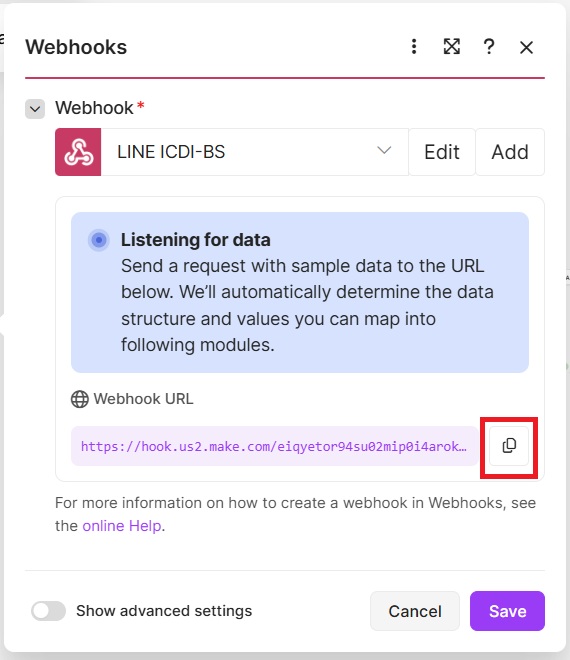
- Click Copy address to clipboard. It looks like
https://hook.us2.make.com/xxxxxxxx.
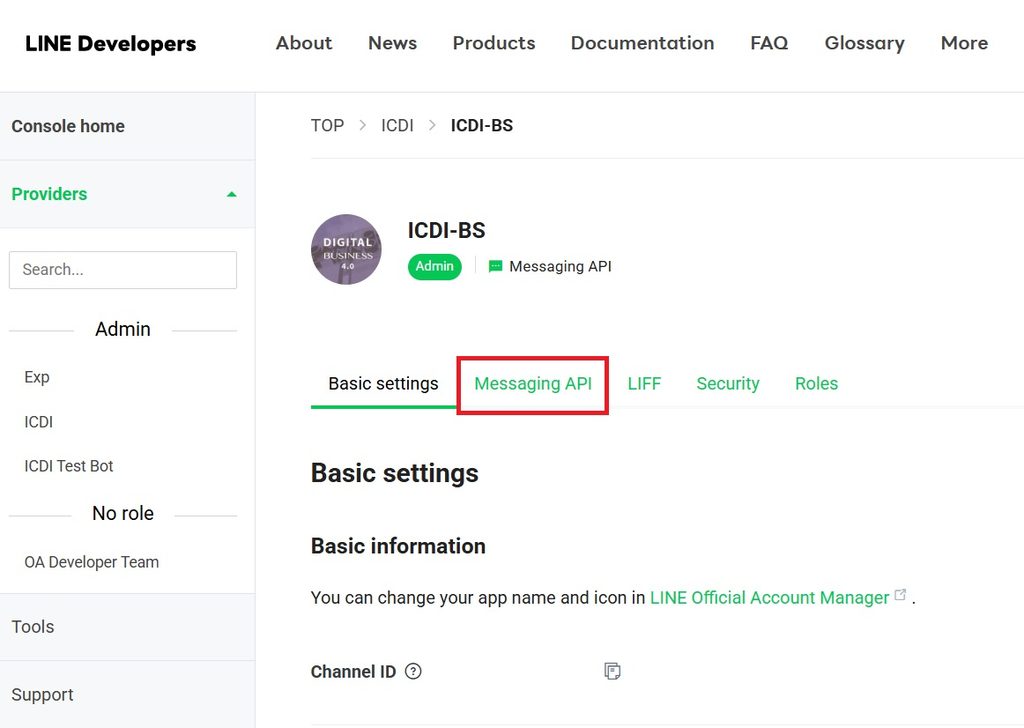
- Open LINE Developers → your provider → your channel → Messaging API tab.
- Webhook URL → Edit, paste the Make.com address, click Update. The URL must start with
hook.and must not start withdialogflow.cloud.google.com.
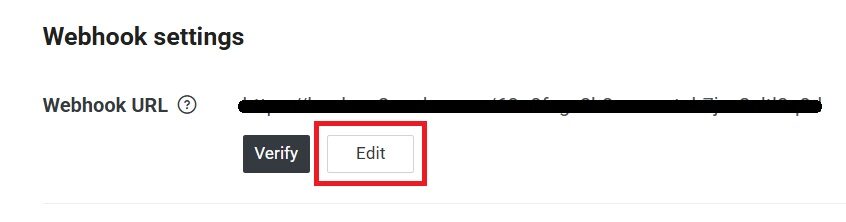
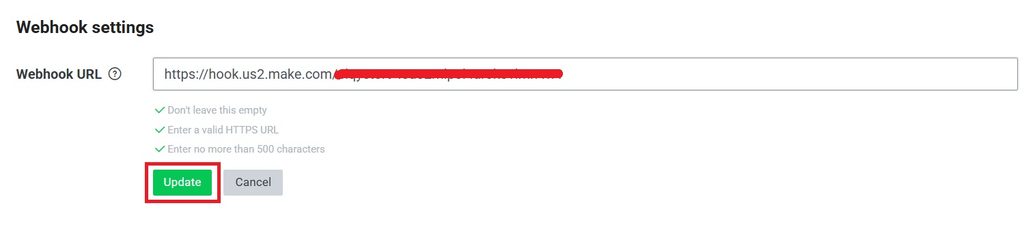
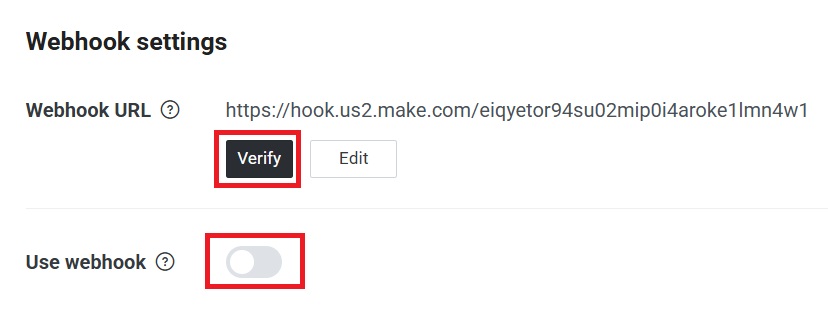
- Verify Webhook and turn Use webhook on.
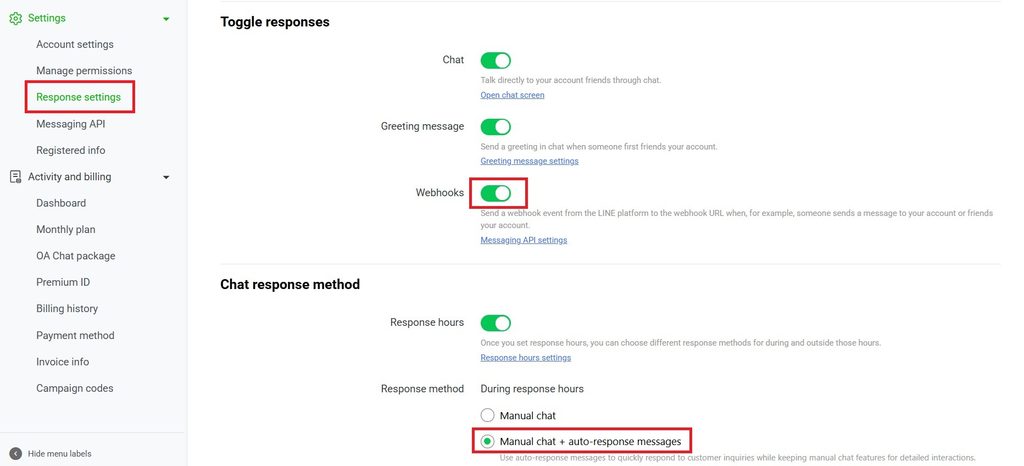
- Open LINE Official Account Manager → Settings → Response settings: Webhooks on, Auto-response messages off, Greeting message optional.
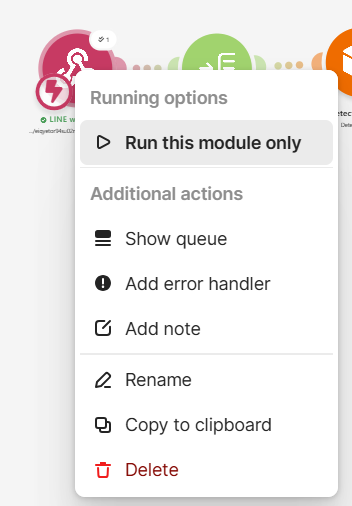
Teach Make.com what LINE sends. Right-click module 1 → Run this module only, then send hello to your bot from your phone.
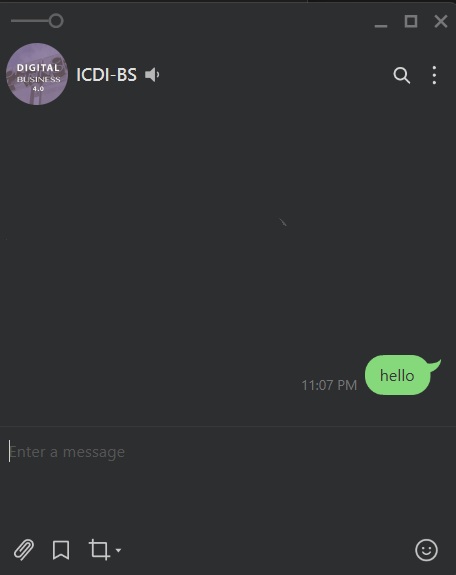
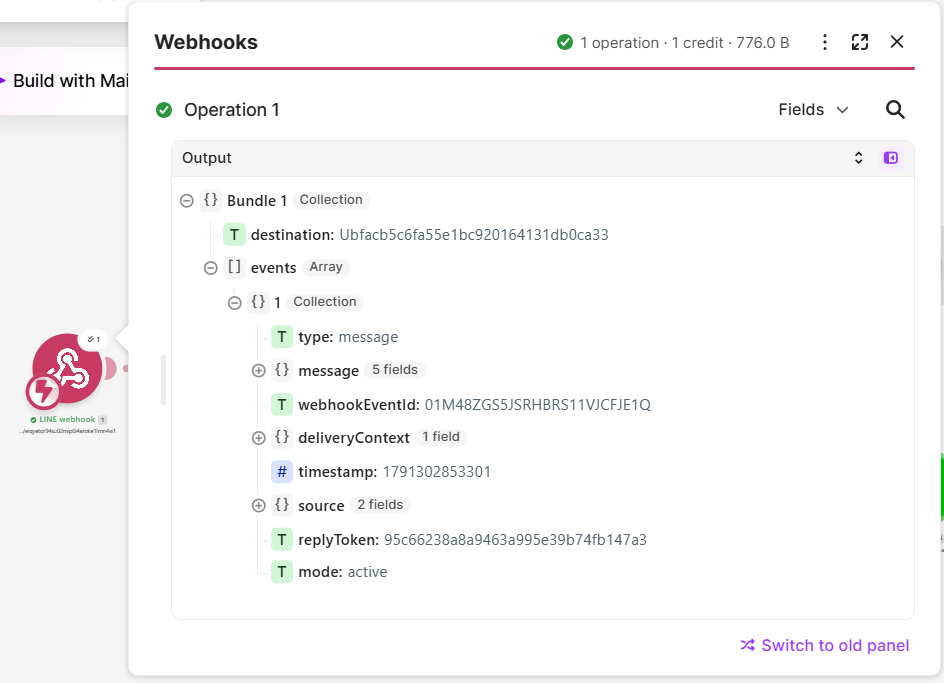
The bubble should show destination and an events list. Module 2 (Iterator) splits events, so every later module reads from module 2: 2.replyToken, 2.source.userId, 2.message.text.
You only need to do this once. If you delete the webhook later, you get a new address and must paste it into LINE Developers again.
The link between module 2 and module 3 carries a filter, Text messages only (2.type = message and 2.message.type = text).
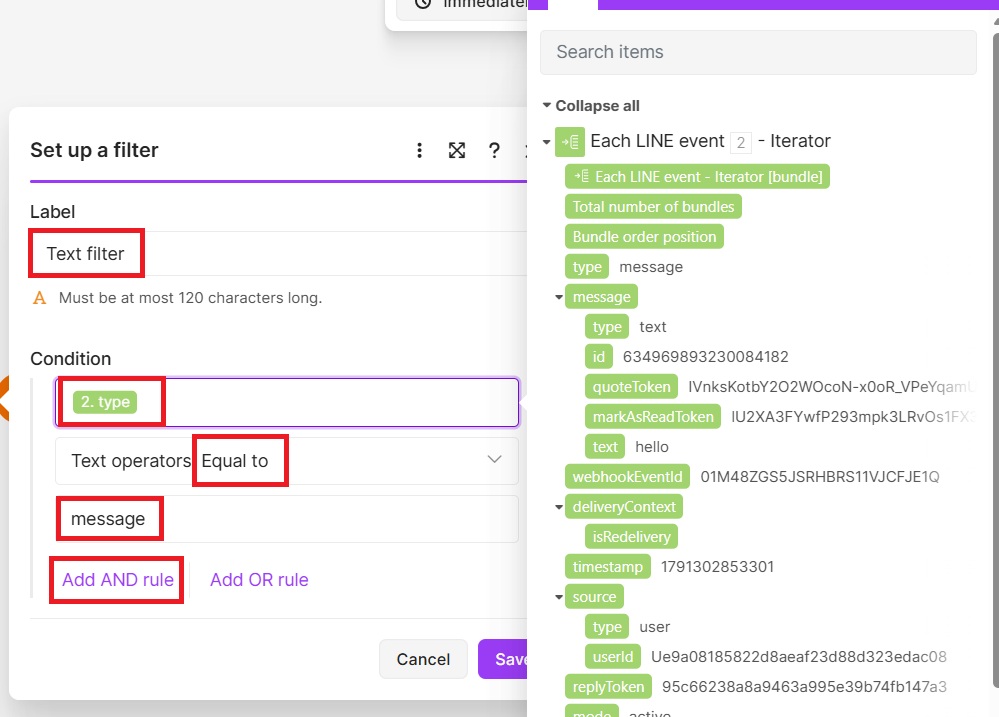
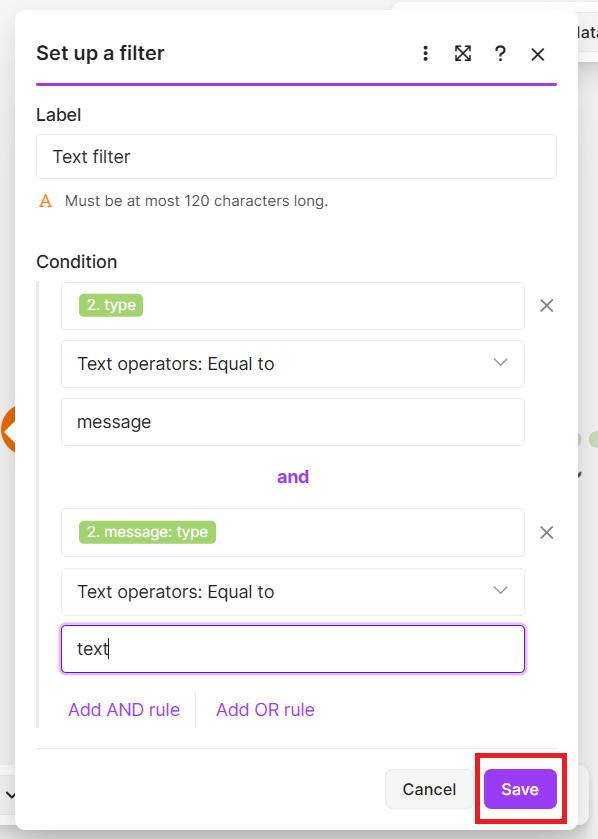
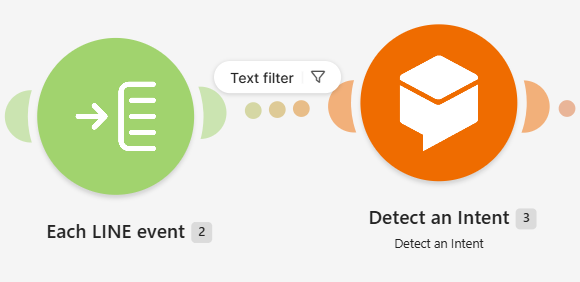
It stops stickers, photos, new followers and LINE’s Verify ping before they reach Dialogflow.
Step 3: Dialogflow connection and Detect an Intent (module 3)
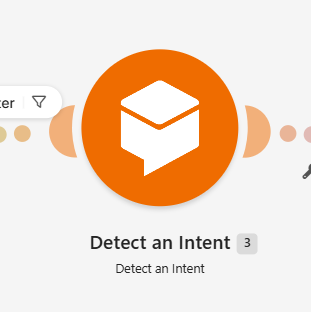
Make.com signs in to your Google Cloud project with an OAuth client that you create. Do Part A once per group, signed in with the Gmail that owns the agent.
Part A: create the OAuth client in Google Cloud
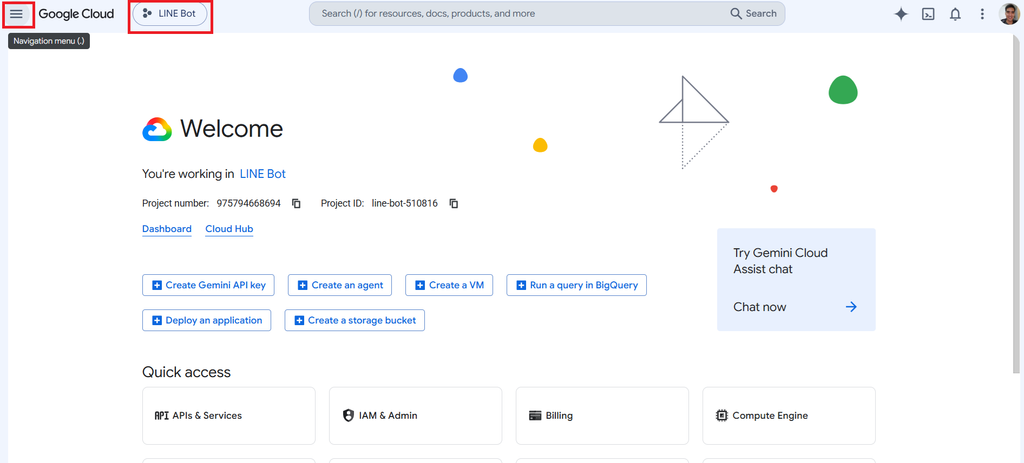
- Open Google Cloud console and select your agent’s project at the top.
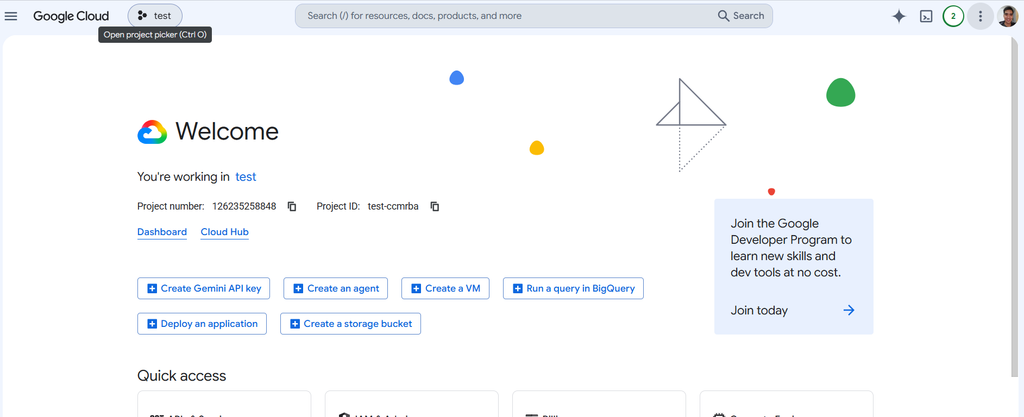
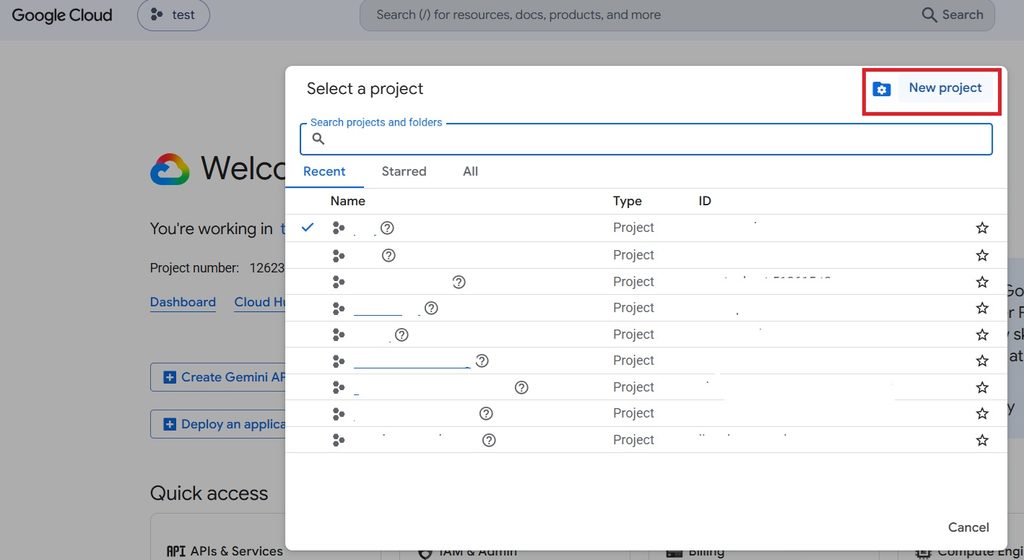
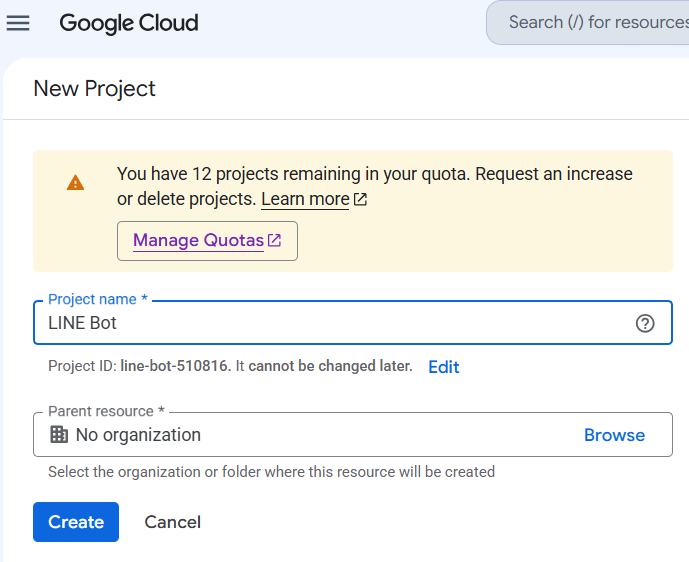
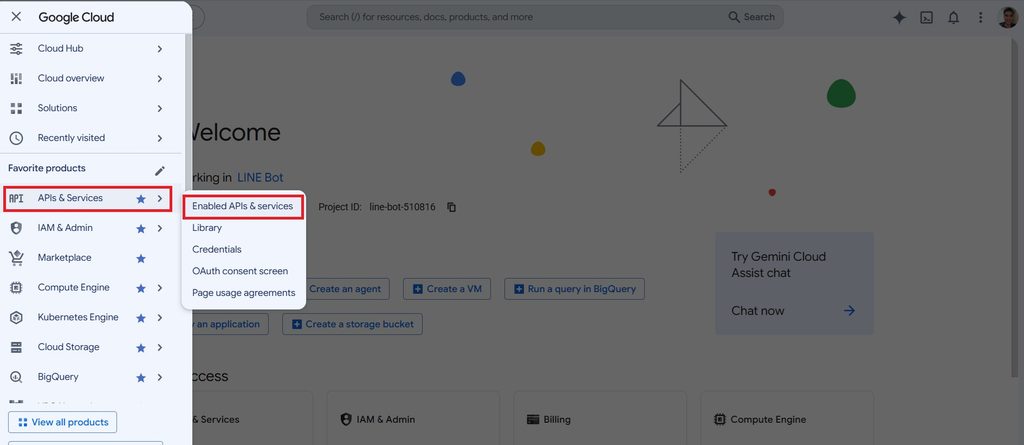
- APIs & Services → Enabled APIs & services: check that Dialogflow API is listed. If not, open Library, search “Dialogflow API”, click Enable.
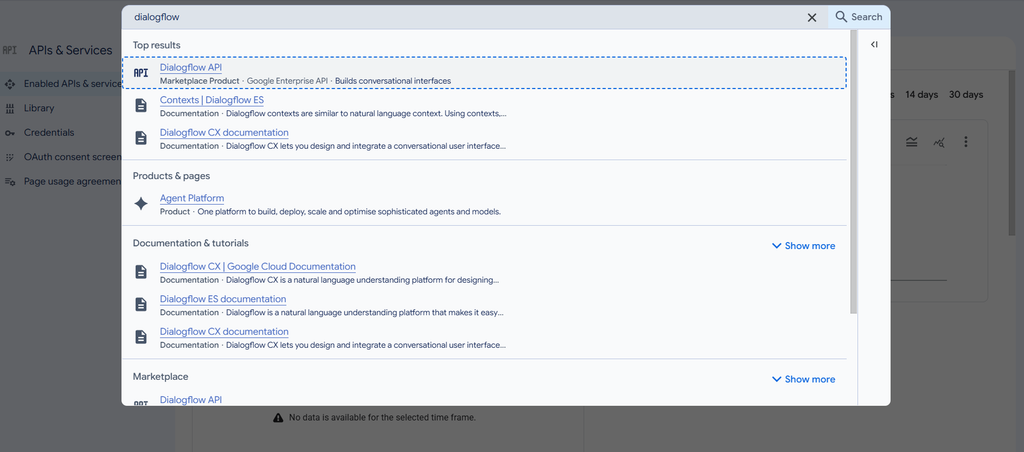
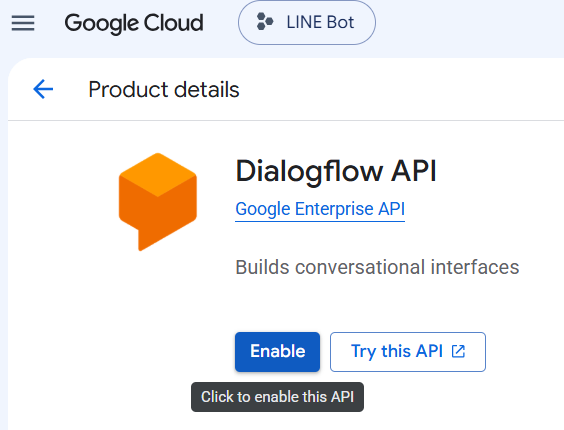
- Google Auth Platform (older consoles: OAuth consent screen) → Get started. App name
Make Dialogflow, support email = your Gmail, Audience External, contact email = your Gmail, accept, Create. - Audience → add every member’s Gmail under Test users.
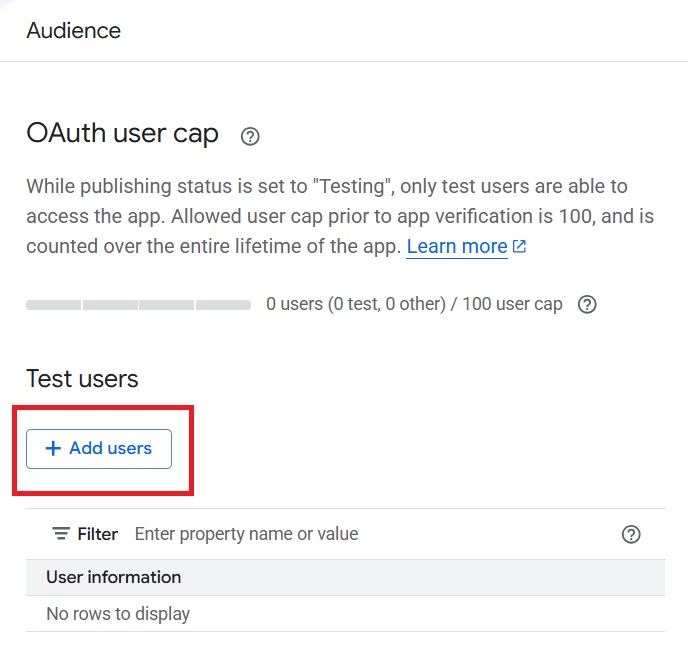
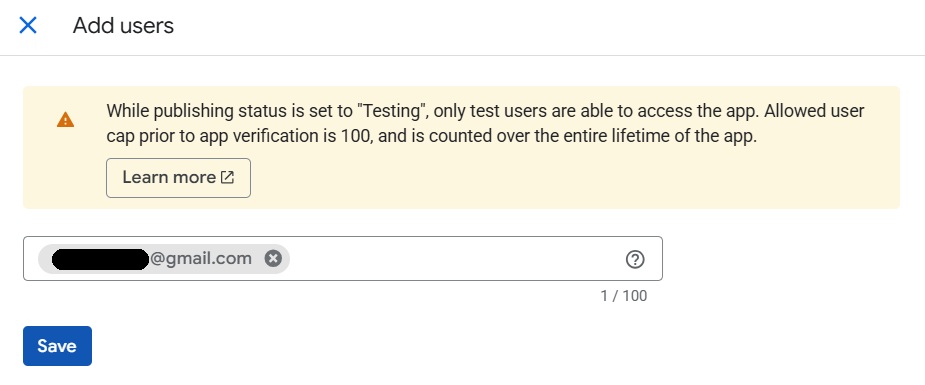
- Clients → Create client: Application type Web application, name
Make.com. Under Authorized redirect URIs add exactly:
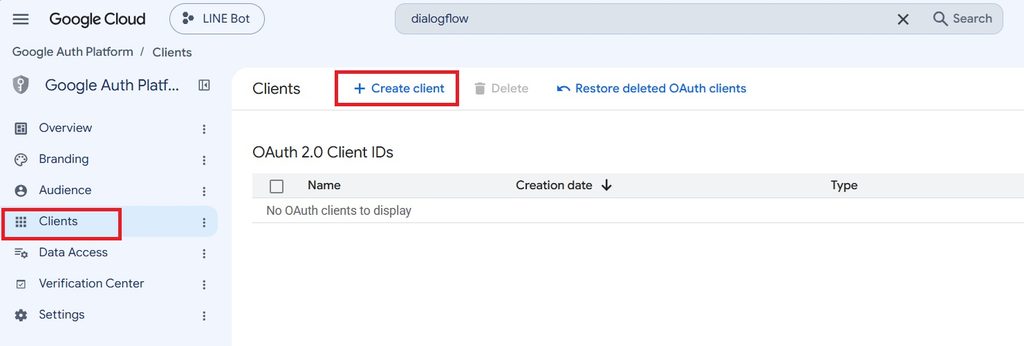
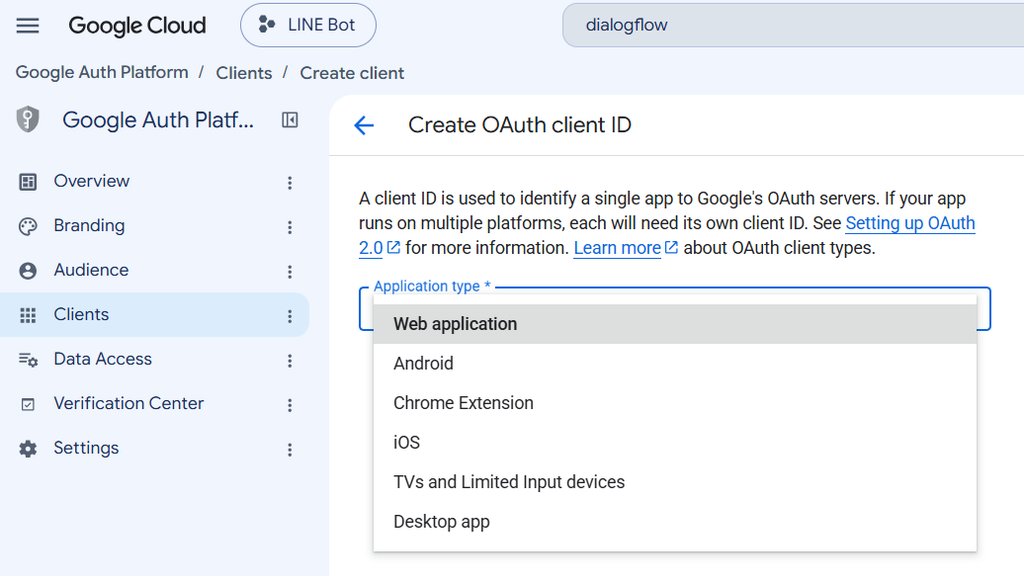
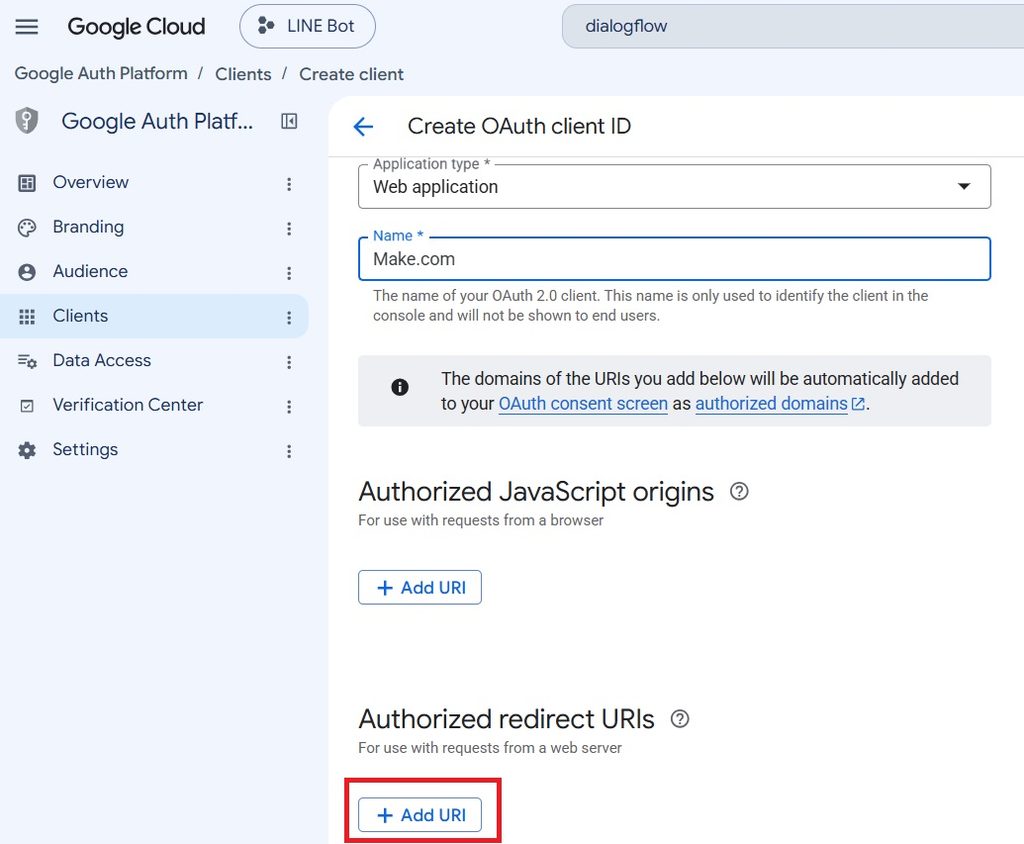
https://www.integromat.com/oauth/cb/google-custom- Click Create and copy the Client ID and Client secret. Wait about 5 minutes before using them.
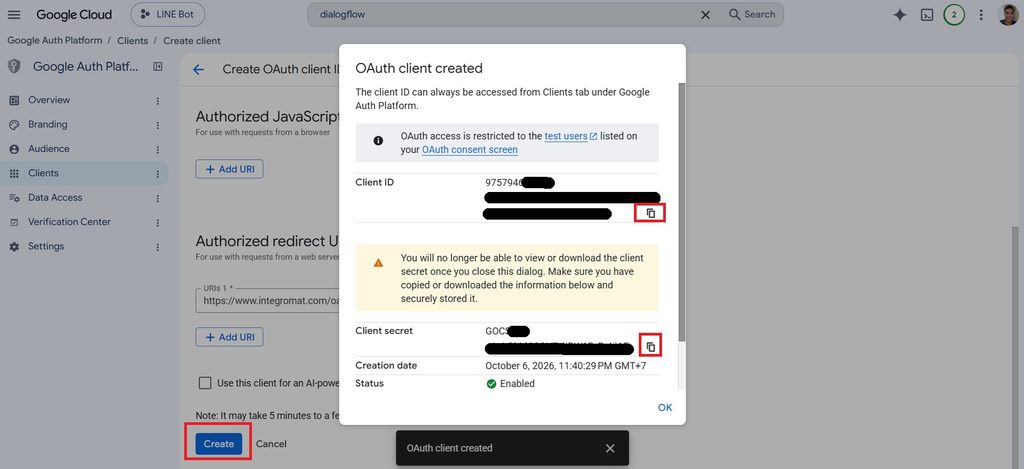
Part B: connect module 3
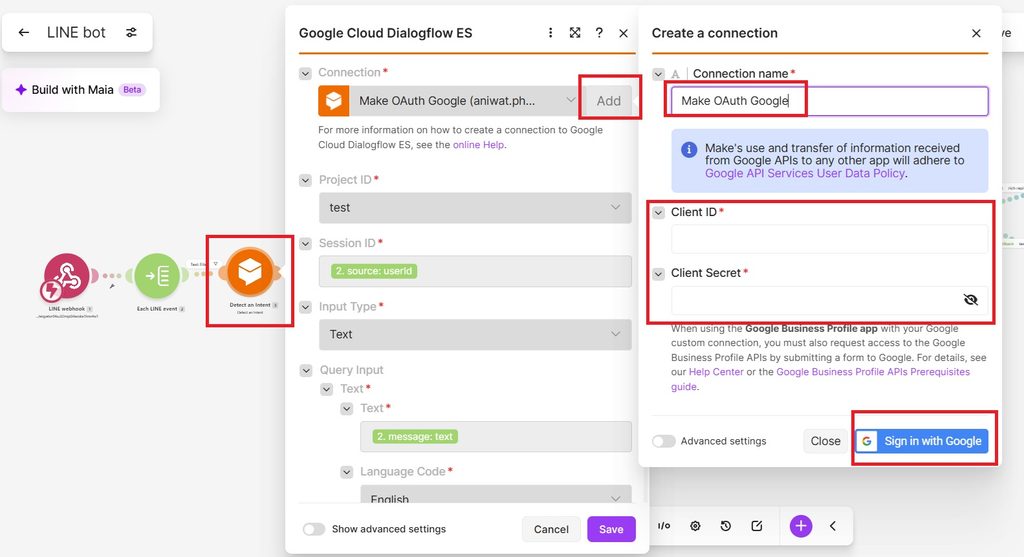
- Open module 3 → Connection → Add → type Make OAuth Google (custom Google connection).
- Paste Client ID and Client secret → Save → sign in with your Gmail.
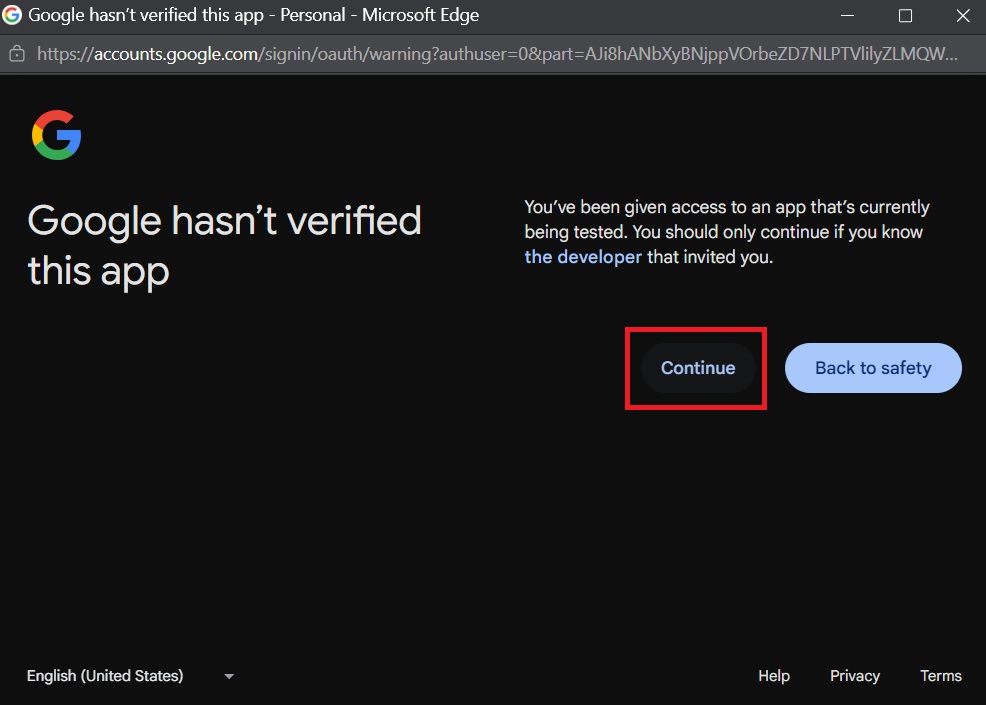
- If Google says the app is not verified, click Advanced → Go to integromat.com (unsafe) → Continue. It is your own app.
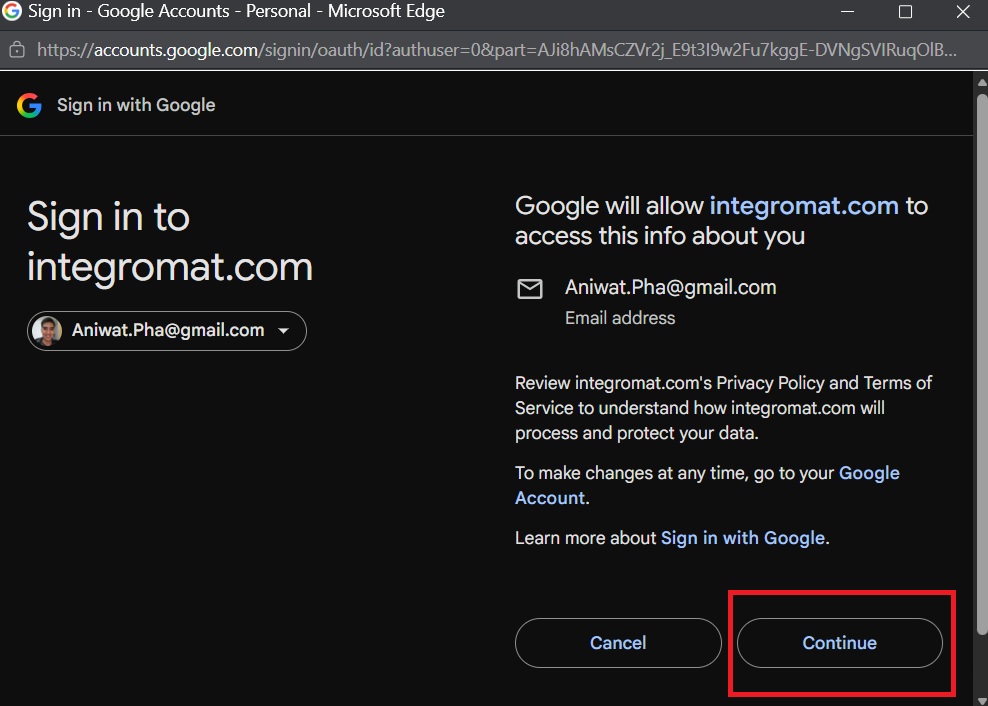
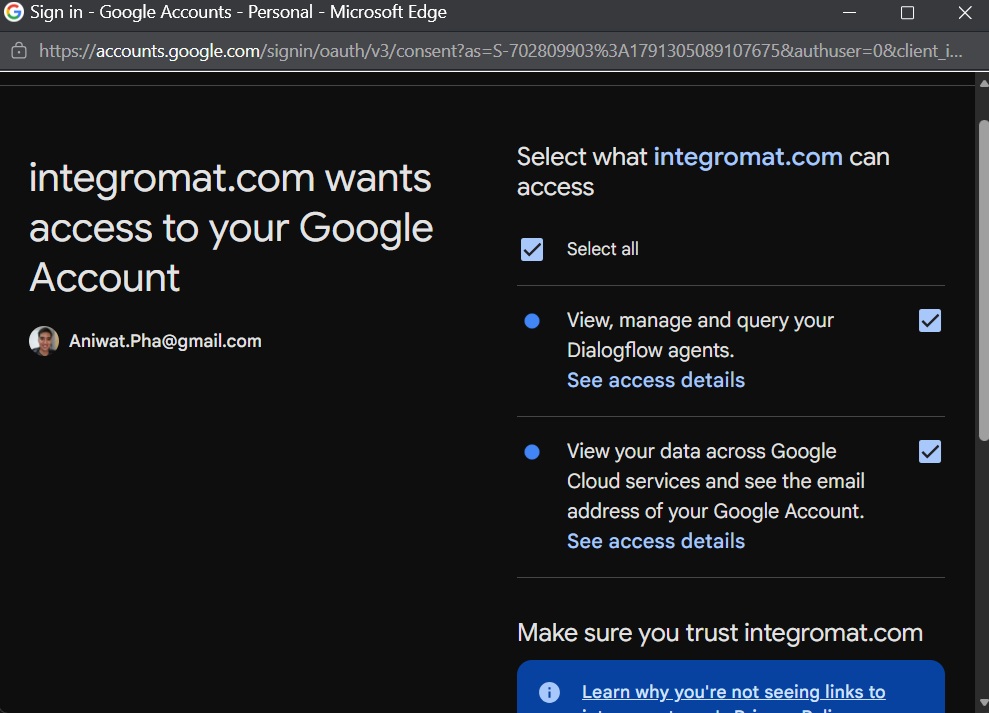
- Pick your project from the list:
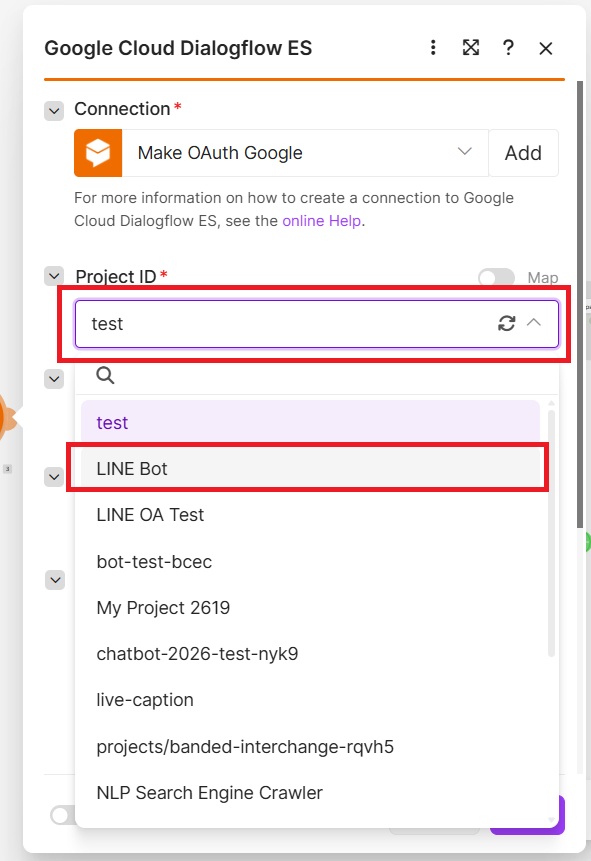
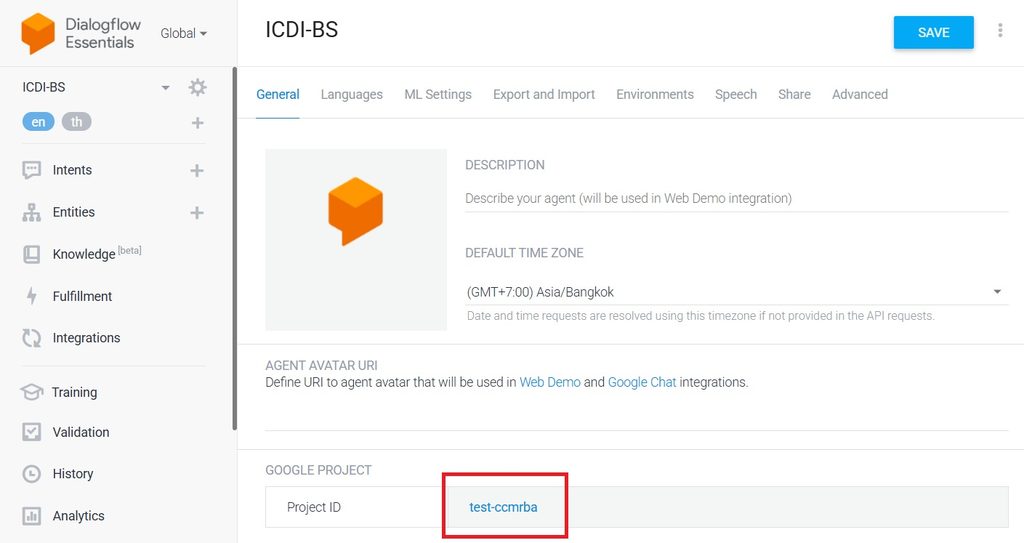
Check if your bot in https://dialogflow.cloud.google.com/ already exists and matches with your selected Project ID.
Fill in the fields:
| Field | Value | Note |
|---|---|---|
| Project ID | pick your project from the list | must match the project shown in Dialogflow settings |
| Session ID | 2.source.userId | already mapped; gives each LINE user their own conversation and contexts |
| Input Type | Text | already set |
| Query Input → Text | 2.message.text | already mapped |
| Language Code | en, or th if your agent’s default language is Thai | must match the language your training phrases use |
Click Save. Module 3 now returns Query Result › Intent › Display Name, Fulfillment Text and Fulfillment Messages[] for every LINE message.
Step 4: LINE reply modules (7 and 23)
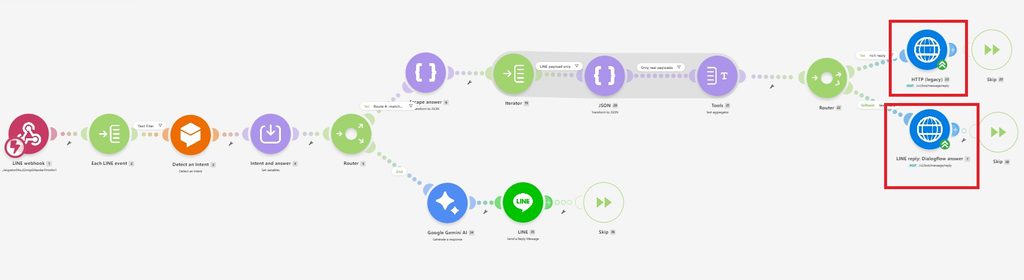
Modules 7 and 23 send replies straight to the LINE Messaging API with an HTTP request. Each one needs your own token.
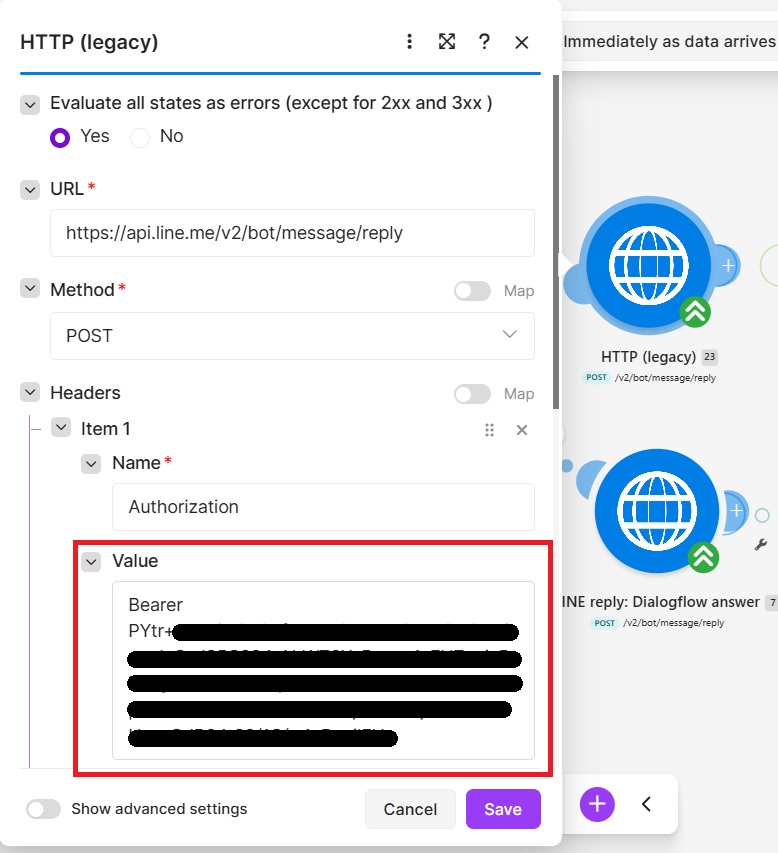
- Open module 7 LINE reply: Dialogflow answer → Headers → the
Authorizationrow. - Replace
YOUR_CHANNEL_ACCESS_TOKENwith your long-lived channel access token in LINE Developers → your provider → your channel → Messaging API tab. Keep the wordBearerand one space in front:Bearer eyJh....
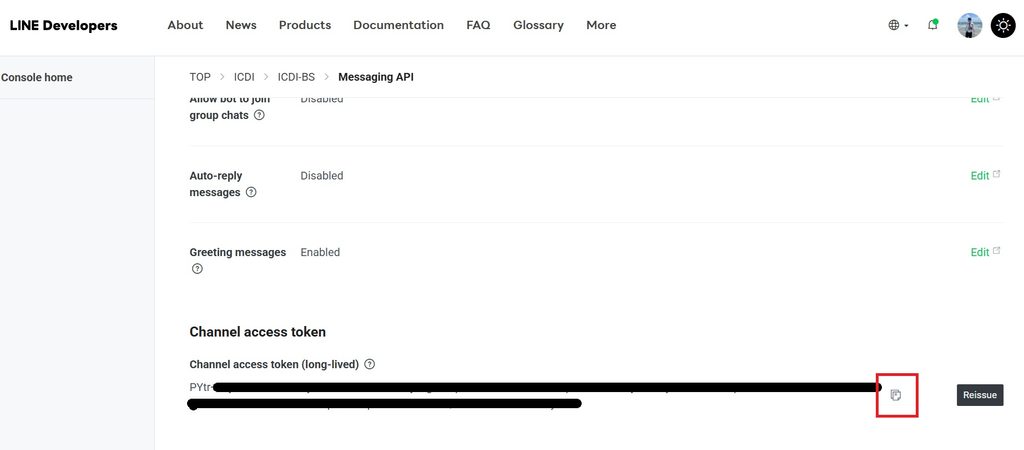
- Do the same in module 23 LINE reply: rich payload.
- Leave URL, method, body type and Request content exactly as imported.
What the two bodies do, so you can read them in the run log:
| Module | Request content | Sends |
|---|---|---|
| 7 | {"replyToken":"{{2.replyToken}}","messages":[{"type":"text","text":{{6.json}}}]} | the intent’s text answer, made JSON-safe by module 6 |
| 23 | {"replyToken":"{{2.replyToken}}","messages":[{{21.text}}]} | every LINE custom payload of the intent, joined by module 21 |
The modules between them are already wired and need no edits:
- 4 Intent and answer stores
intent(display name) andreply(Fulfillment Text). - 19 Each response message walks through
Fulfillment Messages[]. - 20 LINE payload to JSON turns each
payload.lineinto JSON; its filter keeps onlyPlatform = LINE. - 21 Join LINE payloads joins them with commas; its filter drops anything that came out as
nullor{}. - 22 Text or rich? sends to module 23 when there is at least one payload. Otherwise its fallback route sends to module 7.
A reply token works once and expires after about one minute, so each message must end in exactly one of modules 7, 23 or 35.
Step 5: Gemini fallback route (modules 34 and 35)
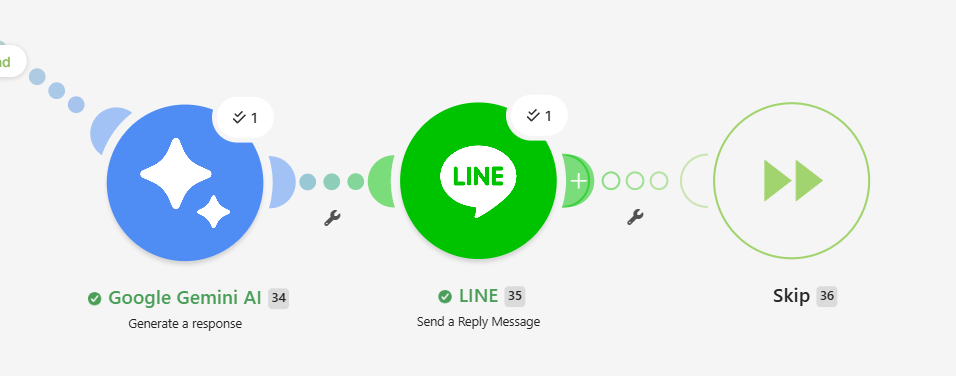
When Dialogflow matches no intent, it returns Default Fallback Intent. The link into module 34 carries the filter Route B: fallback to Gemini (4.intent Equal to Default Fallback Intent), so Gemini runs only then.
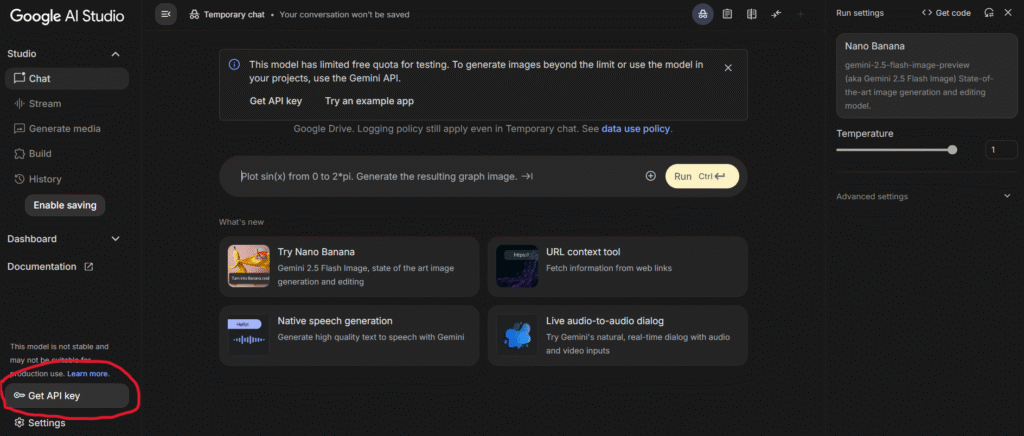
If you don’t have an API key, go to https://aistudio.google.com/ and sign in with the account you used to create an agent in Dialogflow as shown in the picture, then click the “Get API key” button.
Then the screen will appear as shown in the picture, press the “Create API key” button.
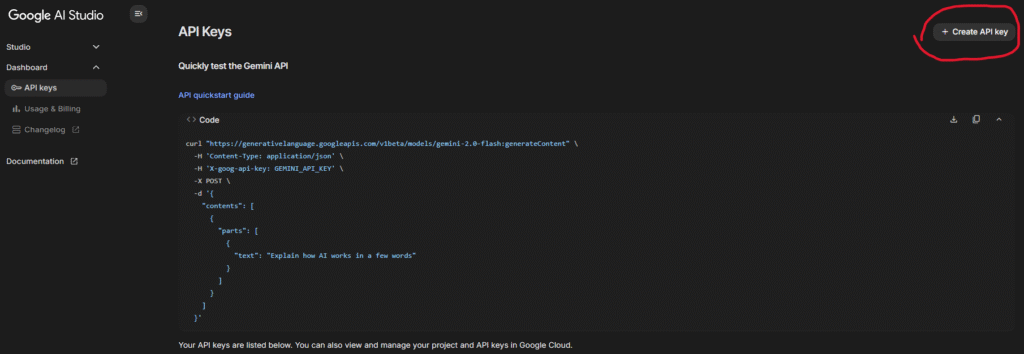
Then, select the project you use, and then press the Create API key in existing project.
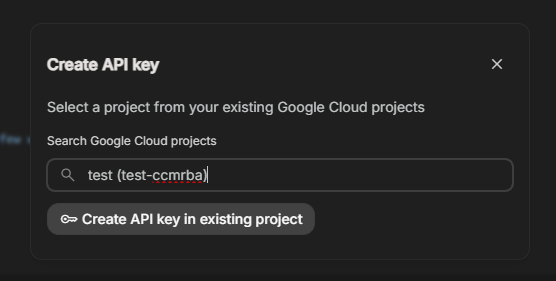
Note: Other Project API keys can be used. It doesn’t have to be the same project as Dialogflow.
Once you get the API key, copy it. Then go back to Make.com, click “Create a connection” button and paste the API key as shown in image. And click “Save” button.
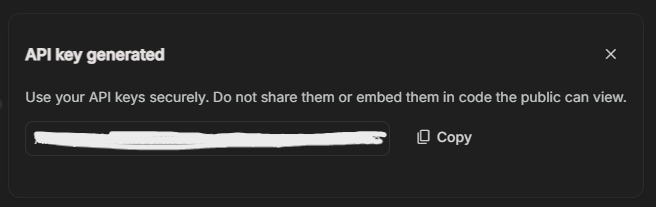
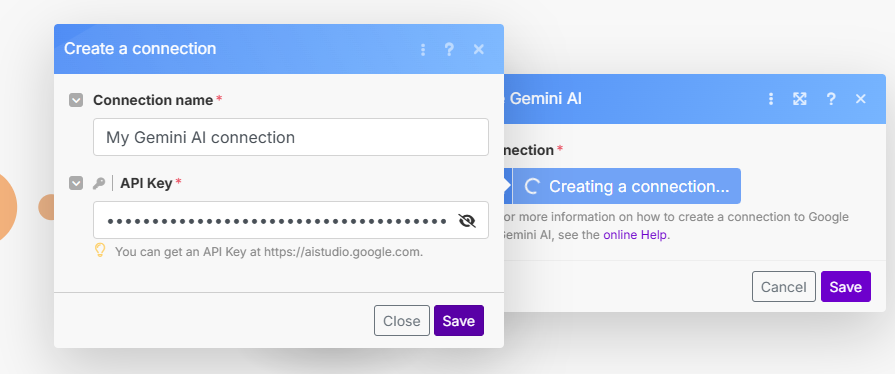
Then, select the Model such as Gemini 3.5 Flash Lite, then select (Model) Input as shown in the image, which will assign the role to this module.
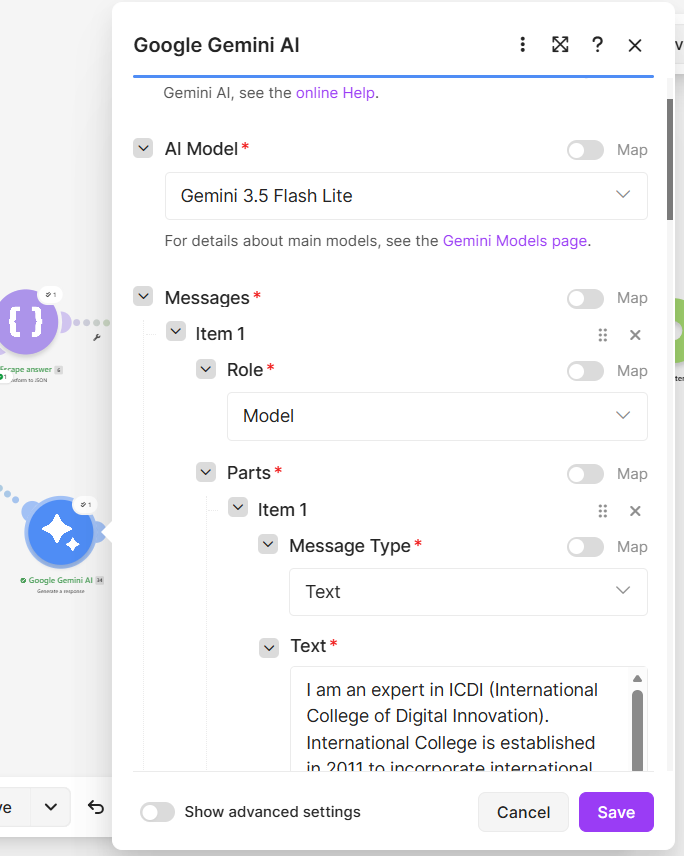
Note: The text can be copied from the content below. You may change this text according to your business information.
“I am an expert in ICDI (International College of Digital Innovation). International College is established in 2011 to incorporate international and bilingual undergraduate programs in Chiang Mai University (CMU). The main academic mission is to facilitate student mobility in ASEAN and Europe. CMU practices ASEAN University Network Quality Assurance (AUN-QA) and ASEAN Credit Transfer System (ACTS) as well as European Credit Transfer System (ECTS). To facilitate the best practices, International College has support roles to other academic faculties in student mobility with credit transfer, Inbound and Outbound visiting professor exchange, Cross Border Co-Research with ASEAN+3 university partners, Common European Framework Reference in English for General Education and Free Elective courses, student leadership program and, other infrastructure and activities for international students in CMU. In CMU, International College plays as the major mechanism for internationalization. Therefore the college assists CMU academic departments to acquire international funding for student and staff exchange in AUN-ACTS, AIMS (ASEAN International Mobility Students), EU-Share and Erasmus Plus as well as Horizon 2020. Other target international scholarships and funds include New Columbo Plan, China Scholarship Council, Reinventing Japan, Korea Foundation, DAAD, Franco-Thai and Newton fund, etc. International College also helps international students to engage the local funds including CMU Presidential Funding, TICA and other Thai government international funding. In 2017, International College has been enhanced her academic roles to entrepreneurship and digital innovation. The enhanced mission directly responds to the Thailand 20 Years Strategic Plan in digital startup especially Digital Economic Cluster for Chiangmai. This aims at development of TransNation Education with leading entrepreneurship and innovation universities in United Kingdom, Australia, China, Korea, etc. The new International College of Digital Innovation (ICDI) offers bachelor, master, doctoral programs in digital innovation and financial technology. Besides the major courses, ICDI also offers General Education and free elective courses in digital entrepreneurship literacy to any CMU students in other faculties. This helps students to learn disruptive digital technologies for engaging new digital economy and society. Today ICDI has 2+2 dual degree programs in entrepreneurship with University of Strathclyde and East China University of Science and Technology. As well as in data analytic, ICDI collaborates with Curtin University and University of Electronic Science and Technology China. To encourage digital startup, ICDI provides academic and training programs for entrepreneurship and innovation. The digital innovation process for SMEs and startups consists of Discovery, Development, Diffuse and Impact by Big Data, mobile application, social network and financial technology respectively. Fundamentally ICDI is doing research and development in cross border e-commerce, logistics and FinTech to bridge Chinese platforms to western platforms for Thai, Chinese and international students. To conduct policy research in entrepreneurship and innovation by using machine learning, research study is based on Supply Side Structural Reform for improving inputs factors for SMEs and startup in new digital economy and society. The intervention of very high-speed broadband Internet such as 4G is the main consideration. The input factors are categorized into land, labor, capital and entrepreneurship and outputs are measured by United Nation Human Development Index which consists of life expectancy, knowledge and net income. By Schumpeterian Cobb-Douglas approach, the creative destruction theory is employed for study of the 10 new S-curve industries of Thailand. The machine learning techniques are used for developing predictive models of decisions, policies, strategies or projects to improve some input factors for the industrial cluster of SMEs and startups. After word, Big Data technology can be utilized for online monitoring the outcome.”
Then, press the Add item button, select the (User) details as shown, then press “Save”.
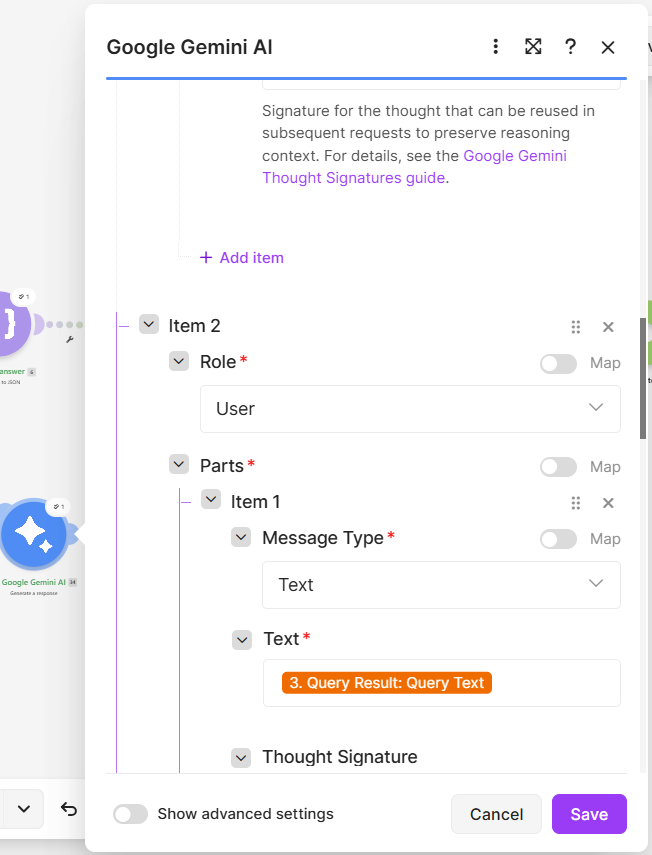
Module 34 Gemini answer
- Connection → Add → paste your Gemini API key → Save.
- AI Model: keep the imported Flash Lite model, or pick another Flash model. Flash models answer within LINE’s one-minute reply window; slower Pro models risk an expired reply token.
- Messages → item 1 (Role: Model): this is the context Gemini reads before every question. Replace every
[BRACKET]with facts about your own platform from Presentation 1. Specific facts (services, hours, prices you are sure of, contact channel) give better answers than general descriptions. - Messages → item 2 (Role: User): leave
3.queryResult.queryText. That is the student’s original question.
Module 35 LINE reply: Gemini answer
- Connection → Add → enter your Channel access token and your User ID (Basic settings tab) → Save.
- Reply Token:
2.replyToken(already mapped). - Messages → Text:
34.result(already mapped).
If you renamed your fallback intent in Dialogflow, type its exact new name in the Route B filter and in the Route A filter (link into module 6), otherwise both routes may run or neither will.
Modules 7, 23 and 35 each have an Ignore error handler attached. A failed reply then stops quietly instead of turning the scenario off, so always check the run log while testing.
Step 6: Build Dialogflow responses for this flow
How you write each intent’s response in Dialogflow decides which module answers in LINE.
| Response you build in Dialogflow | Where it appears in module 3 | Module that replies | What LINE shows |
|---|---|---|---|
| Text response on the Default tab | Fulfillment Text | 7 | plain text |
| Text response on the LINE tab | Fulfillment Text and Fulfillment Messages (Platform LINE, Text) | 7 | plain text |
Custom payload on the LINE tab, {"line": {...}} | Fulfillment Messages (Platform LINE, Payload) | 23 | any LINE message type |
| Text and custom payload in the same intent | both | 23 | payloads only; the text is dropped |
| Card, Image or Quick Replies built-in types on the LINE tab | Fulfillment Messages, but not as LINE JSON | none | nothing; convert them to custom payloads |
| No response at all | empty | 7 | error 400 (text may not be empty) |
Rules that follow from the table:
- Give every intent at least one response.
- For rich messages, use LINE tab → Add Responses → Custom payload, one block per message, at most 5 per intent.
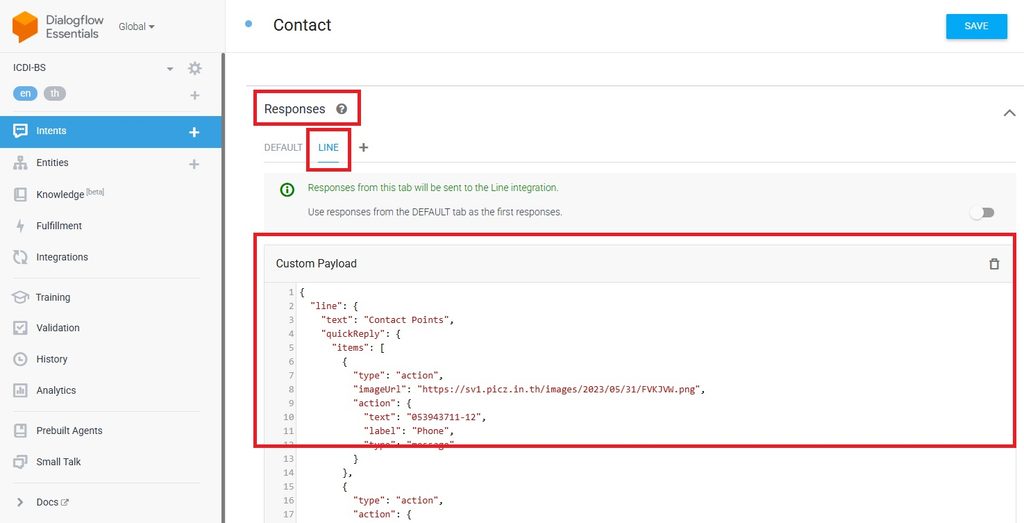
- To send text together with a rich message, add the text as one more custom payload:
{"line":{"type":"text","text":"Here is our menu"}}. - Inside
"line", use any object from the LINE message types reference. Design Flex messages in the Flex Message Simulator and paste the JSON.
Two custom payload examples:
{"line":{"type":"text","text":"Contact Points","quickReply":{"items":[
 {"type":"action","action":{"type":"message","label":"Phone","text":"phone number"}},
 {"type":"action","action":{"type":"uri","label":"Website","uri":"https://icdi.cmu.ac.th/"}},
{"type":"action","action":{"type":"location","label":"Share location"}}]}}}{"line":{"type":"sticker","packageId":"446","stickerId":"1988"}}Step 7: Test, including the fallback
Test with Run once first, then switch the scenario on. Every message should light up exactly one of modules 7, 23 or 35.
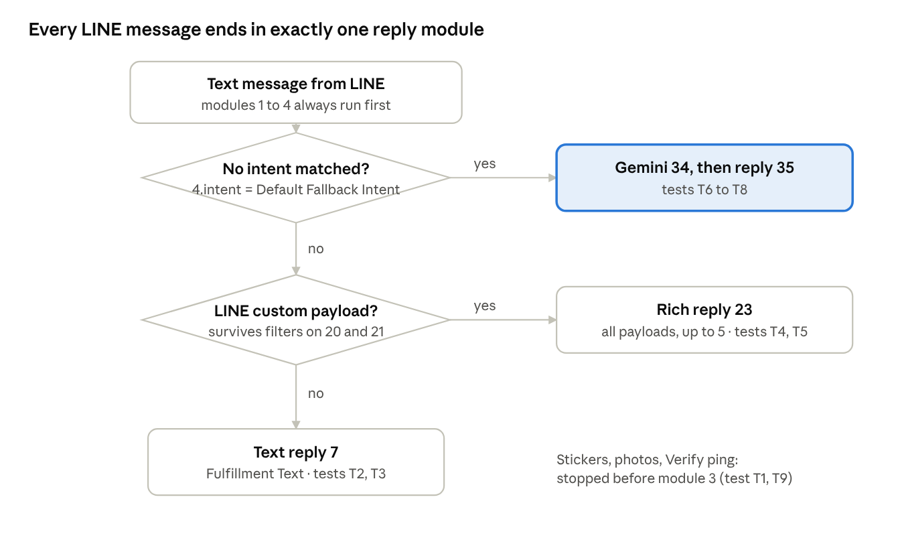
Run these tests in order. For each one, click Run once, send the message from your phone, then check the bubbles and the LINE chat.
| Test | Send from LINE | Expected path (bubbles) | Expected in LINE | Pass when |
|---|---|---|---|---|
| T1 | Click Verify in LINE Developers | 1 runs, 2 outputs nothing | nothing | Verify shows Success |
| T2 | A phrase of a Default-tab text intent, e.g. hello | 1→4, Route A, 19→22, 7 | the text answer | 7 status 200 |
| T3 | A phrase of a LINE-tab text intent | same as T2 | the LINE text | 7 status 200 |
| T4 | A phrase of an intent with one custom payload | Route A, 21 has text, 23 | rich message (quick reply, sticker, flex) | 23 status 200 |
| T5 | A phrase of an intent with 2 or more payloads | same as T4 | all payloads in order | 23 status 200 |
| T6 | Off-topic question in English, e.g. any quiet café near CMU? | Route B, 34, 35 | Gemini answer about your platform | 35 succeeds, 6 and 7 do not run |
| T7 | Off-topic question in Thai | Route B, 34, 35 | answer in Thai | same as T6 |
| T8 | Nonsense, e.g. asdfgh qwe | Route B, 34, 35 | short polite answer | same as T6 |
| T9 | Send a sticker or photo | 1, 2, filter “Text messages only” stops | nothing | no error in history |
| T10 | Three different messages within 10 seconds | three separate runs | three answers | each run has one reply |
Fallback in depth. For T6 to T8, open the bubbles and check four places:
- Module 3 output → Query Result → Intent: Display Name
Default Fallback Intent, Is Fallbacktrue. Note Intent Detection Confidence. - Filter labels on the router: Route A shows ⊘0, Route B shows a tick and 1.
- Module 34 output → Result: the text Gemini wrote. Check it uses facts from your prompt, not invented ones.
- Module 35: no error. If it fails with an invalid reply token, the run took too long; check the run duration in History and choose a faster model.
Then tune the boundary between your intents and Gemini:
| You see | Meaning | Change |
|---|---|---|
| A real question about your platform goes to Gemini | the intent lacks matching training phrases | add 5 to 10 more phrases to that intent, including Thai if users write Thai |
| An off-topic question triggers one of your intents | the match threshold is too low | Dialogflow → gear → ML Settings → Classification threshold: raise it (for example from 0.3 to 0.5), save, retest |
| Gemini invents facts | the prompt lacks those facts | add them to module 34’s Model message, or tell Gemini to say it is not sure |
| Gemini answers in English to Thai questions | the prompt rule is missing | keep “Reply in the same language the user writes in” in the prompt |
Troubleshooting
| What you see | Where | Cause | Fix |
|---|---|---|---|
| Bot never answers, no new run in history | Make.com | Scenario off, or LINE webhook still points to Dialogflow | Turn scheduling on; set the Make.com URL in LINE Developers |
Module 1 output shows queryResult, not events | 1 | Make.com URL pasted into Dialogflow Fulfillment instead of LINE | Create a new webhook, put it in LINE Developers only |
| Iterator (2) outputs nothing | 2 | Data structure not learned | Right-click 1 → Redetermine data structure, send a message |
redirect_uri_mismatch | Google sign-in | Redirect URI differs | Add https://www.integromat.com/oauth/cb/google-custom exactly |
| “has not completed the Google verification process” | Google sign-in | Gmail not a test user | Publish the app, or add the Gmail as a test user |
| Status 400 when saving the connection | 3 | Wrong secret or client type | Copy the secret again; type must be Web application |
Detect an Intent: 403 or invalid_grant | 3 | Sign-in expired, wrong project | Reauthorize the connection; check Project ID |
| Every message goes to Gemini | 3, 5 | Language code differs from agent, or weak training phrases | Match en/th; add training phrases |
LINE 400 May not be empty, messages | 23 | No real payload reached module 21 | Check the intent has a LINE custom payload in {"line":{...}} form |
LINE 400 text may not be empty | 7 | Intent has no text response | Add a response to the intent |
LINE 400 Invalid reply token | 7, 23, 35 | Two routes replied, or reply came after about 1 minute | Check filters; use a Flash model |
| LINE 401 | 7, 23 | Bearer missing or token wrong | Header = Bearer + space + token |
| Gemini answers for intents that should match | 5 | Route B filter missing | Filter on link into 34: 4.intent Equal to Default Fallback Intent |
Modules with an Ignore handler fail quietly. Open History, click the run, then click the module bubble and read Status code and Data.
Leave a Reply